Contact forms are an essential part of any website. They can help you get leads, build relationships with your readers, and solve queries.
WordPress has tons of options to create a contact form. You have dedicated contact form plugins such as WPForms that specialize in creating all types of forms. You also get form builders built into page builder tools such as Elementor.
In this article, we’ll walk you through the steps to create an Elementor contact form, explain some of its features in detail, and tell you if it is a good choice to use it instead of a dedicated contact form plugin.
How To Create A Contact Form Using Elementor
This article is applicable only for Elementor Pro users as the form widget is part of Elementor Pro. To proceed with this tutorial, make sure you have both the free and Elementor Pro versions of Elementor installed on your website.
To create a form, you can either import a contact form Elementor template or create it from scratch.
1. Create and Publish a New Page
To add a form widget, first, create a new page from the WordPress navigation menu, name it, and publish it.
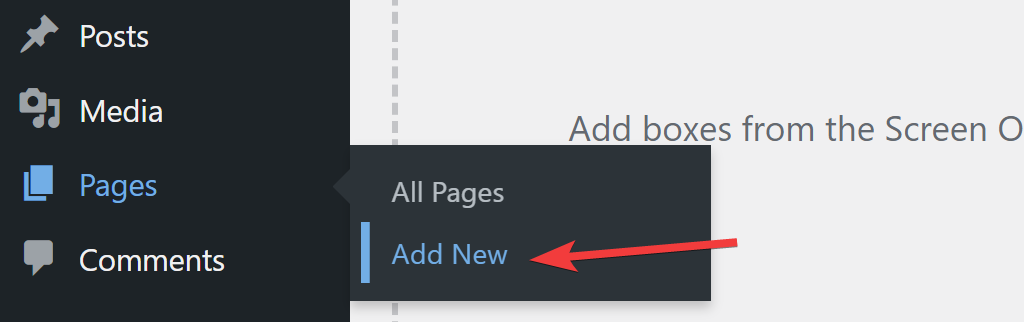
After that, click Edit with Elementor to open the editor.

On the right side, you should see all of the Elementor widgets.
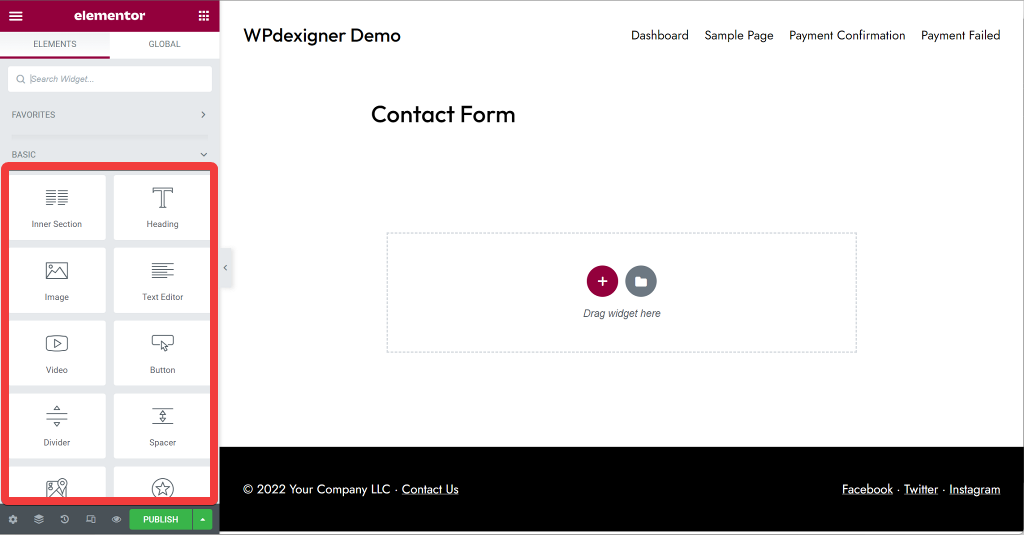
If you are using Elementor Pro, you will see the Form widget under the Pro section.
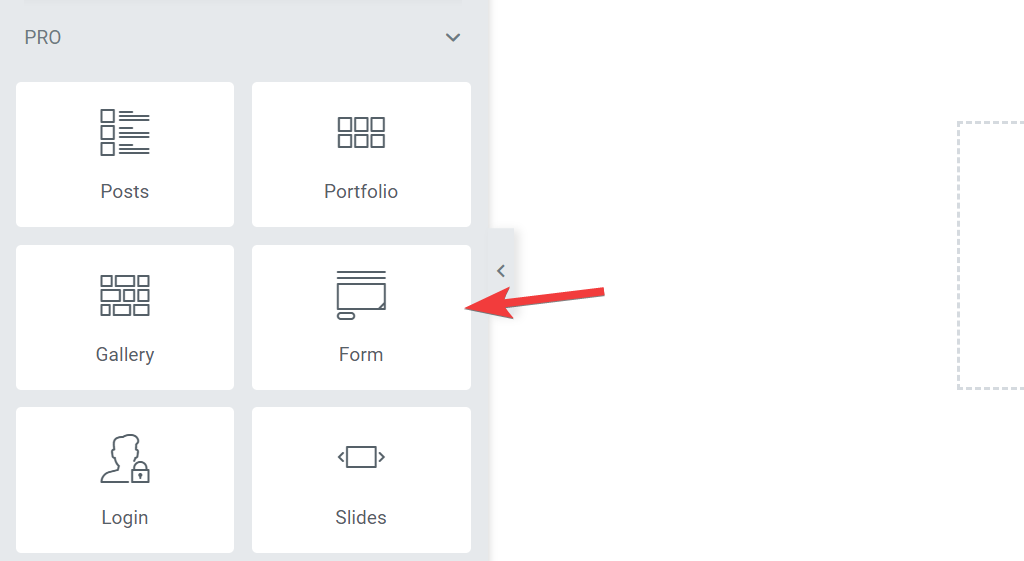
Drag the Form widget and place it into the editor to have a default basic form appear.
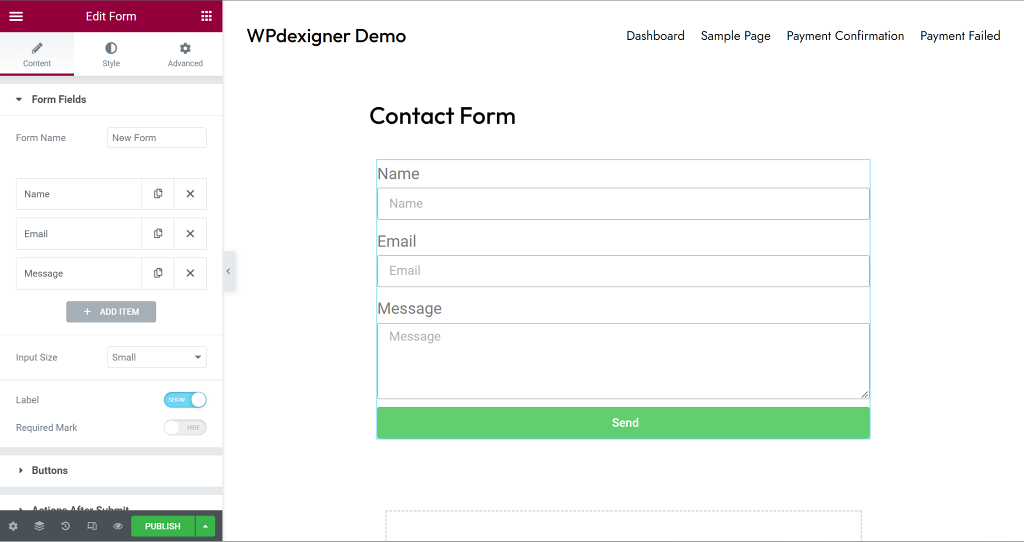
Let’s see how we can customize the form with more fields and styling.
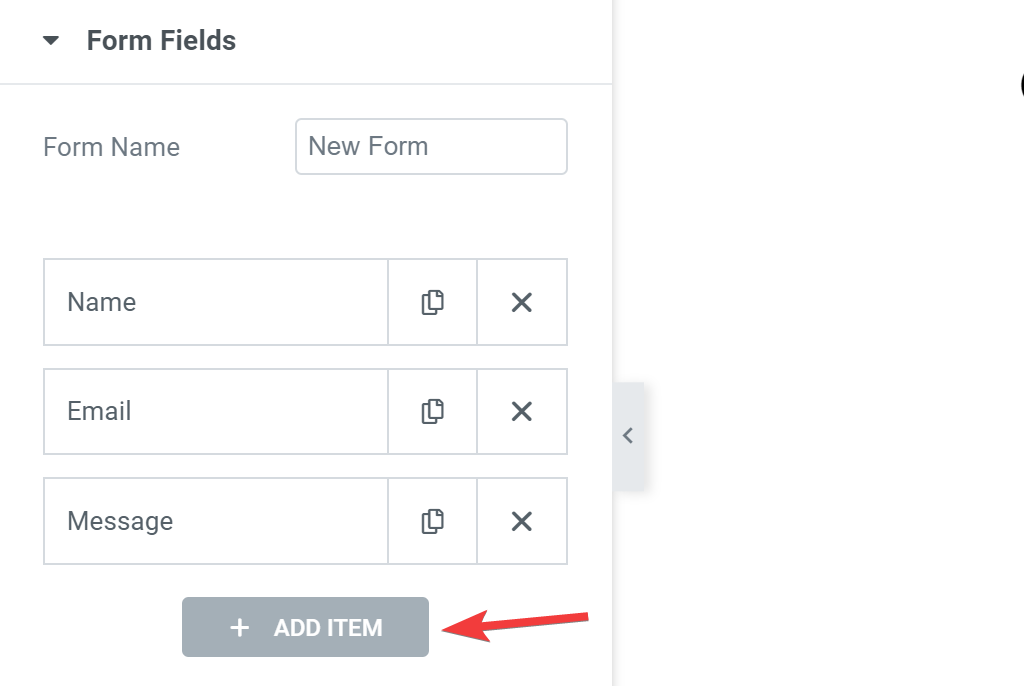
2. Add a New Field
To add a new field or remove an existing one, click on the form widget. This will display all of the options of the form in the widget pane.
You can add new fields to the form by clicking the Add Item button, or remove an existing one by clicking the cross sign next to each field.
3. Various Fields of Elementor Contact Form
When you click on an individual field, you will be presented with new options for customizing or changing the field. Elementor Form supports a wide variety of field types and options, and you might be wondering what they are just by looking at them.
Let’s go over each field type and common options in detail.
The options are divided into two tabs: Content and Advanced.
Let’s first check the options in the Content tab.
The Content Tab
The Content tab lets you choose the field type and add label and placeholder text to it.
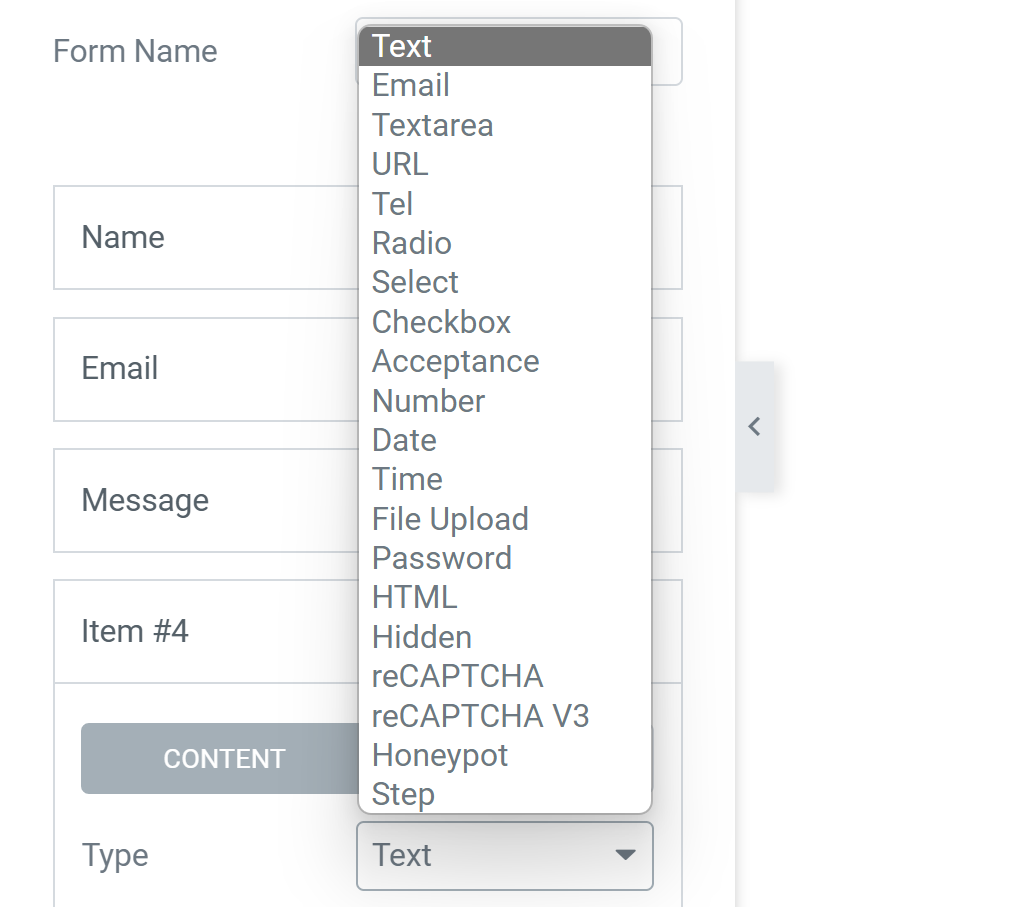
- Type – List of form fields to add to the form. The various fields available are:
- Text – A simple text field having a single row. i.e., Name
- Email – This is a self-explanatory field. A field for an email address that Includes validation features.
- Text Area – A text field for long message. You can set the number of rows as the length of the message.
- URL – A website URL field.
- Tel – A telephone number type.
- Radio – A radio button that works as single choice option. You can choose between a vertical or horizontal style.
- Select – A dropdown list of options that can be set to multiple selections.
- Checkbox – A checkbox type that lists the options and offer multiple selection. You can choose between a vertical or horizontal style.
- Acceptance – Add terms and condition checkbox for the user to accept.
- Number – A field for number input.
- Date – A date picker field that opens as calendar.
- Time – A time picker field with option for AM and PM.
- File Upload – Allow users to upload files to the form.
- Password – It allows users to type and set a password through the form.
- HTML – You can use this field to add custom content to the form through HTML. Users can’t edit or add information to this field and is only available for representation.
- Hidden – Add a hidden field. The field is hidden to the user, but visible to the Admin.
- Step – Lets you convert the form into multi-steps.
- reCAPTCHA – Add Google reCaptcha that throws a challenge to verify user presence and stop contact form spam.
- Honeypot – A spam detection field.
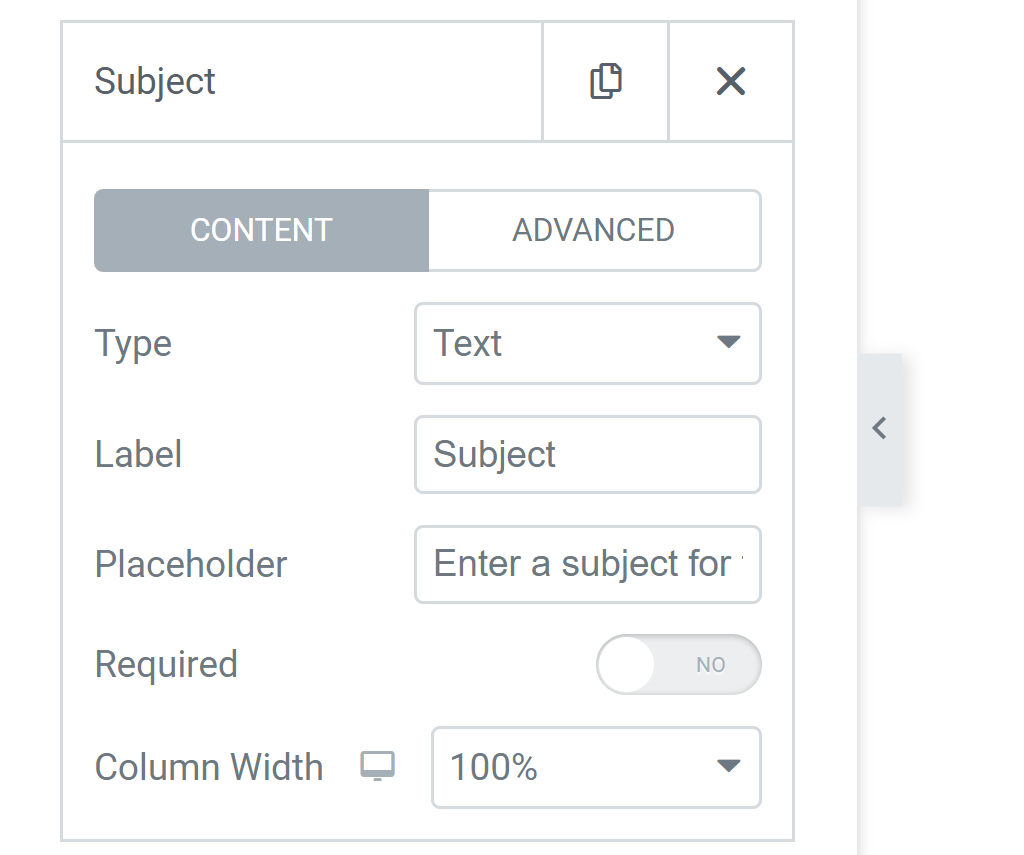
- Label – The name that is displayed on the form above the box. Write something that explains the field’s purpose.
- Placeholder – The text that is displayed on the frontend inside the field box. It can give the user an idea about the value that is to be entered.
- Required – Switch it on to set the field as a Required field. Users cannot submit the form without filling that specific field.
- Column Width – It lets you adjust the width of the form fields. You can set the width to 50%, and two fields will displayed inline.
The Advanced Tab
In the Advanced tab, you will see three fields out of which two will be pre-filled.
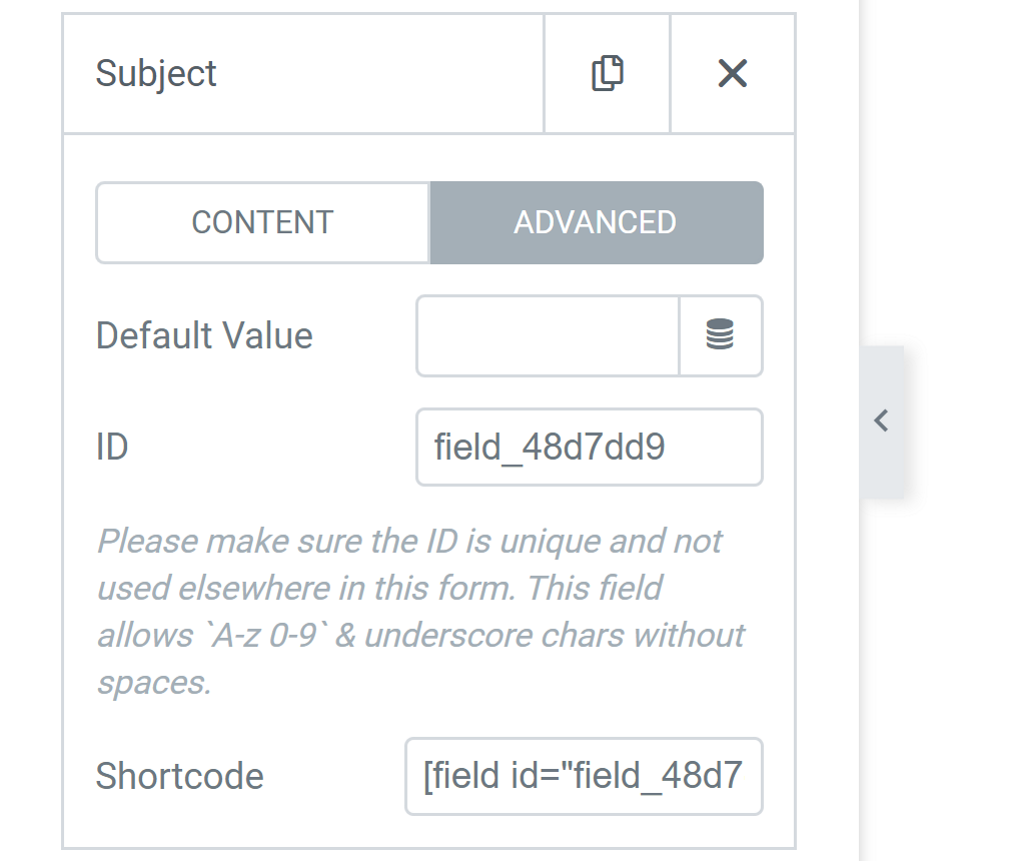
I will suggest you not to touch these options and leave them as they are. But for the sake of this article, I will explain them in short.
- Default Value – You can set a default value for the field that users are likely to fill. This will makes it easy for the users as values will appear pre-filled for them.
- ID – A unique ID given to the field.
- Shortcode – You can use this shortcode to specify the fields in the email notification later.
Below the two tabs, there are a few more options that are applicable to all fields of the Elementor form on the page.
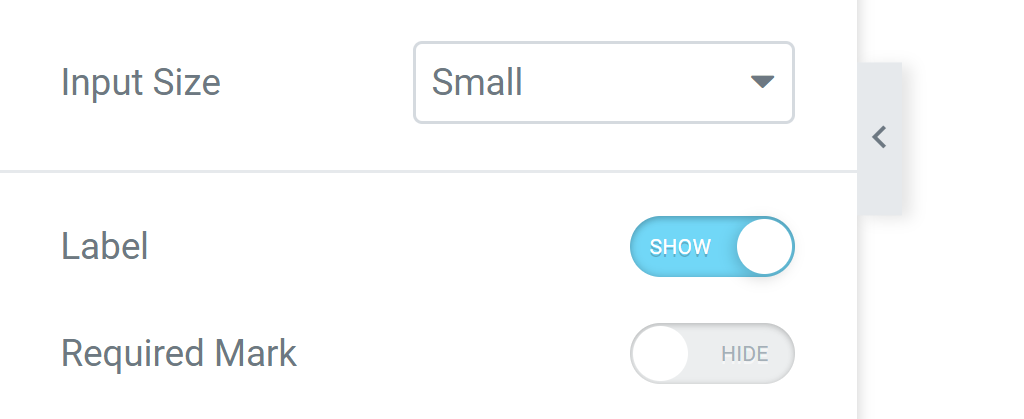
You can configure the field input size, show or hide the field label, and mark or hide the required field with a red mark.
Now that we have made ourselves familiar with all the fields, let’s move ahead and customize the submit button next.
4. Design The Submit Button
The next section is the submit button. Here, you can change the text and appearance of the button.
Let’s look at the available options for the submit button.
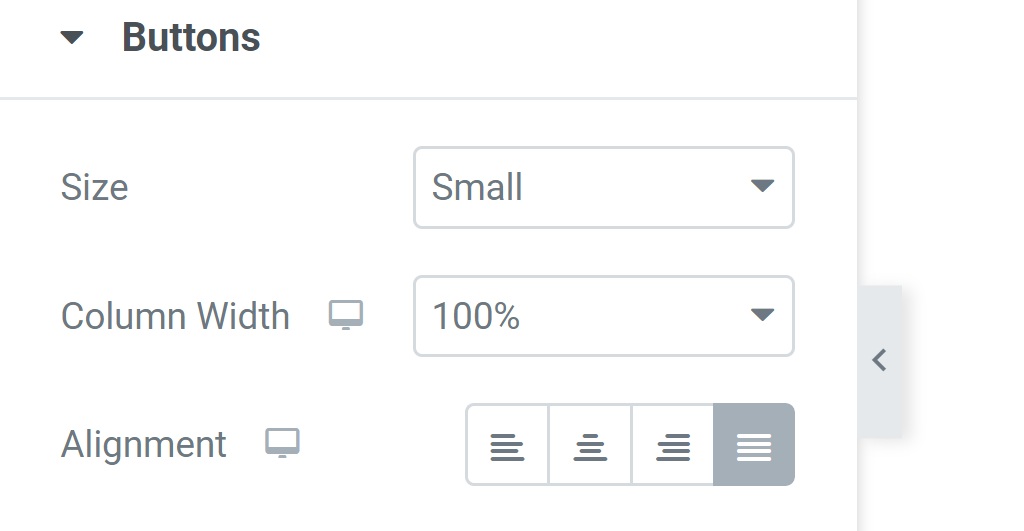
- Size: You can choose between different button sizes between Extra Small, Small, Medium, Large, and Extra Large.
- Column Width: Set the column width in percentage or keep it as default for the button to take the width based on the text inside.
- Alignment: You can choose an alignment or keep it as justified.
If you have a multi-step form, the next options will let you customize the step buttons.
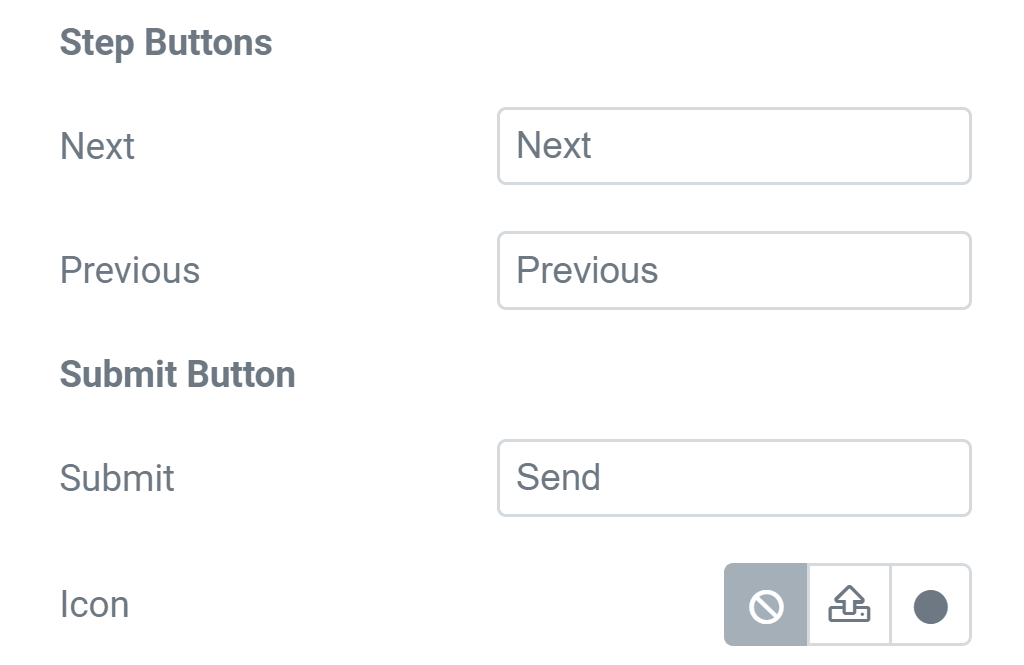
- Next: Set the button text that appears on the next step button.
- Previous: Set the previous button text that appears on the previous step button.
I will suggest you keep both button values as default as it makes sense and explains the purpose.
The next options are for the end submit button in the multi-step form or the regular submit button.
- Submit: Set the text for the submit button.
- Icon: An icon is an excellent way to draw the user’s attention. You can choose from the available icons or upload your own. More options become available after you select an icon. You can also specify whether the icon should appear before or after the submit button text. You can then adjust the spacing between the icon and the text.
- Button ID: Set an ID for the button if you want to further customize it with CSS, or leave it blank.
You may wonder, “Is this all I need to know to create a contact form with Elementor?”
Please hold on to your seats. There’s more to it than that. Next, you can specify what happens when a user submits the form. Let us look into it.
5. Actions After Submitting The Elementor Contact Form
After filling out the form, the reader clicks the submit button. You have several options for what happens to the response. As you select more actions, new sections appear in the form settings.
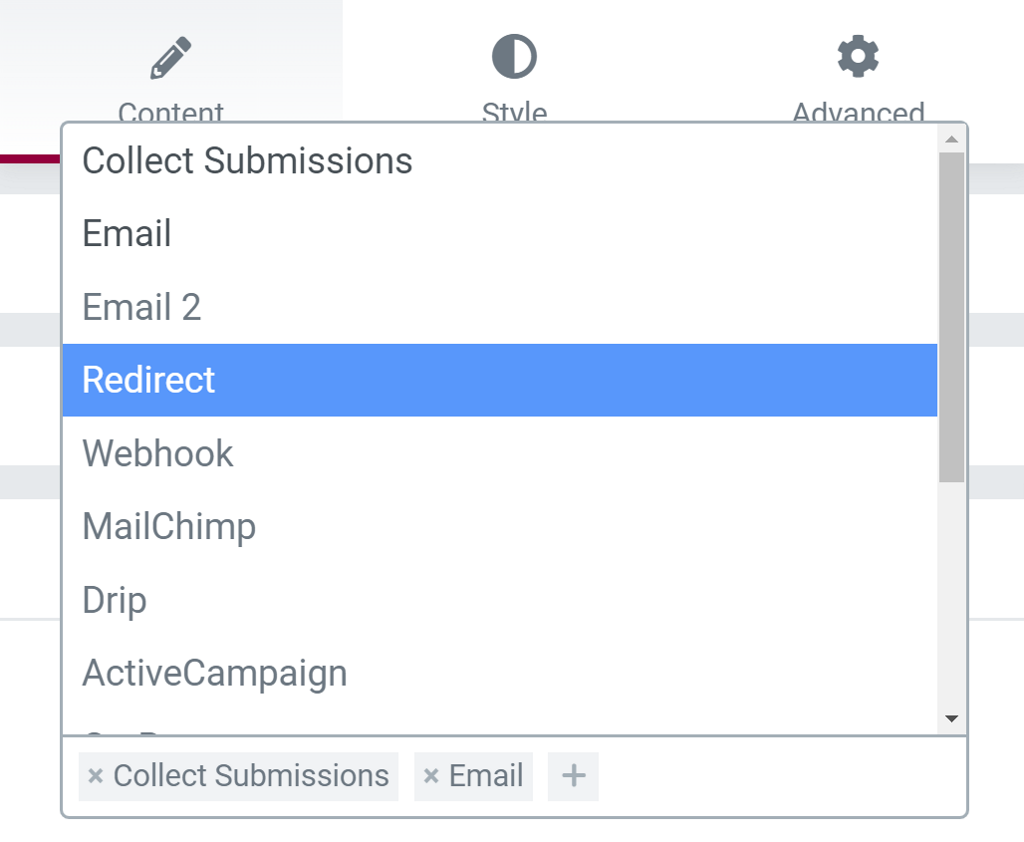
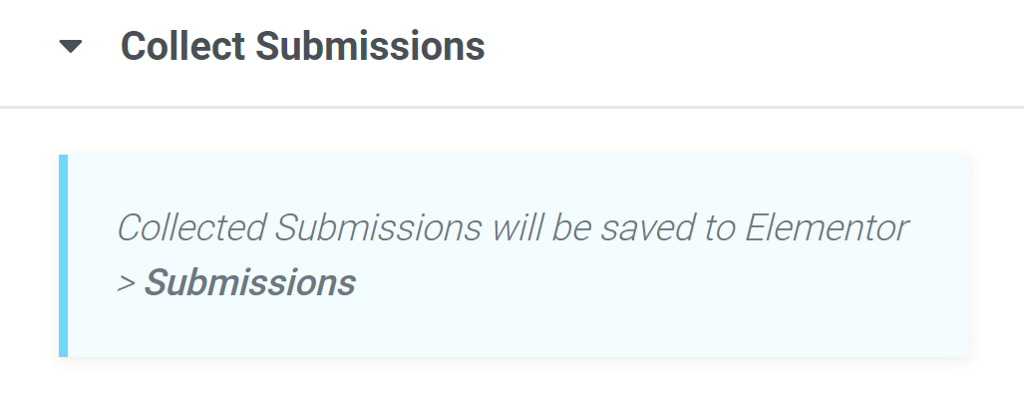
Collect Submissions: Elementor form submissions allows you to view all of your form submissions directly from the WordPress dashboard. If you include the Collect Submissions action, Elementor will save all submissions, which you can view at Elementor → Submissions.
Email – This is a preselected action. This action sends a notification email to the website owner informing about the submission. As this is a preselected actions, an Email tab appears below in the form settings. The options for email notifications are:

- To – Specify to whom the email should be sent. You can add multiple email addresses separated by commas.
- Subject – Specify the subject of the email notification.
- Message – The body of the email. If you want all fields to be displayed, use the shortcode [all-fields], or you can choose the shortcodes of particular fields.
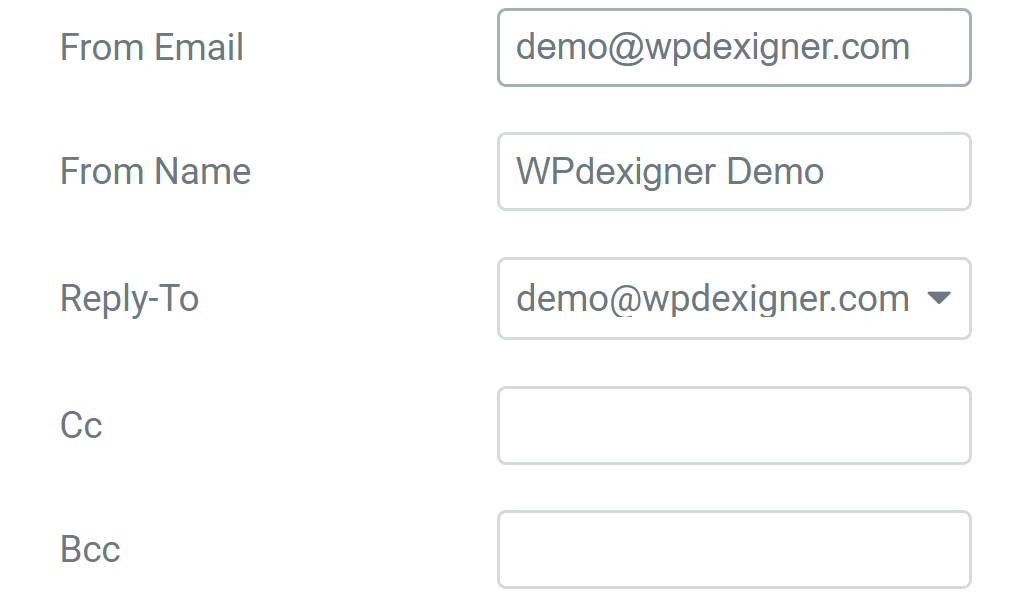
- From Email – The email address used for sending the email. For better deliverability, you can use WP Mail SMTP to setup SMTP for sending emails from your website.
- From Name – Specify the From Name for the email notification.
- Reply To – Specify the email address the mail will be sent to if you click on reply in your email client.
- CC – Want to keep someone in the CC? Specify their email addresses separated by commas.
- BCC – Want to send it to a BCC? Specify their email addresses separated by commas.
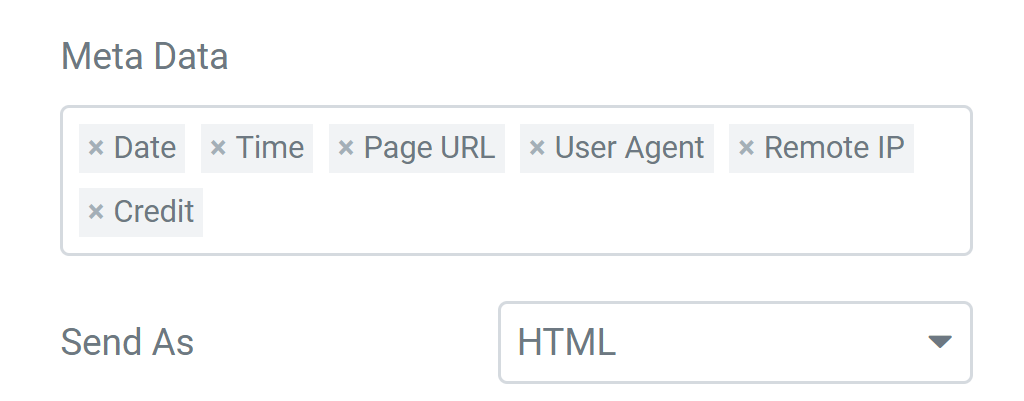
- Metadata – The data to be included at the end of the email. The data include the date and time on which the form was submitted. The page from where the form was submitted and others. Choose the one which you want to keep and remove the ones you don’t want.
- Send As – Choose the format of the in which to send the email, either as HTML or Plain Text.
Elementor contact form is beyond the basic contact forms. It is an advanced tool with some personalization features.
Email 2 – This is another email notification that you can configure to send to the user who fills the form. The options you get are similar to the first Email action that we saw above, but you would want to change some of the fields to personalize the user experience.
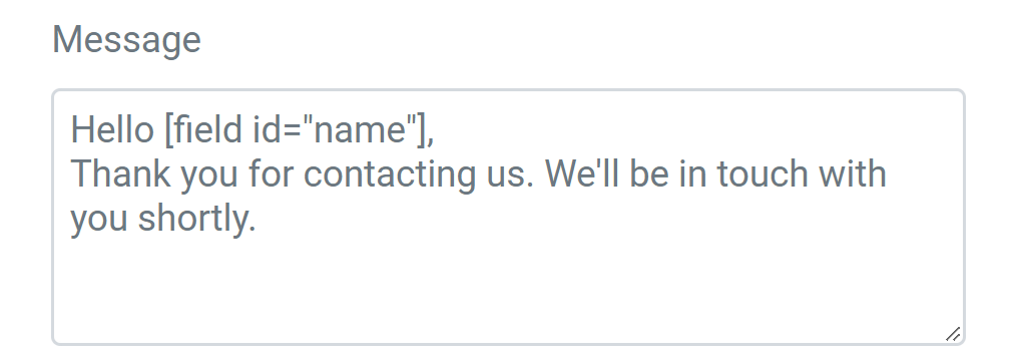
- Message – Create a custom message and paste it in the message box. You can personalize the experience using the submitter’s first name (‘Hello [field id= “name”]’).
Redirect – Another great way to personalize the user experience. Redirect the reader to a custom Thank You page after he has successfully submitted the form.

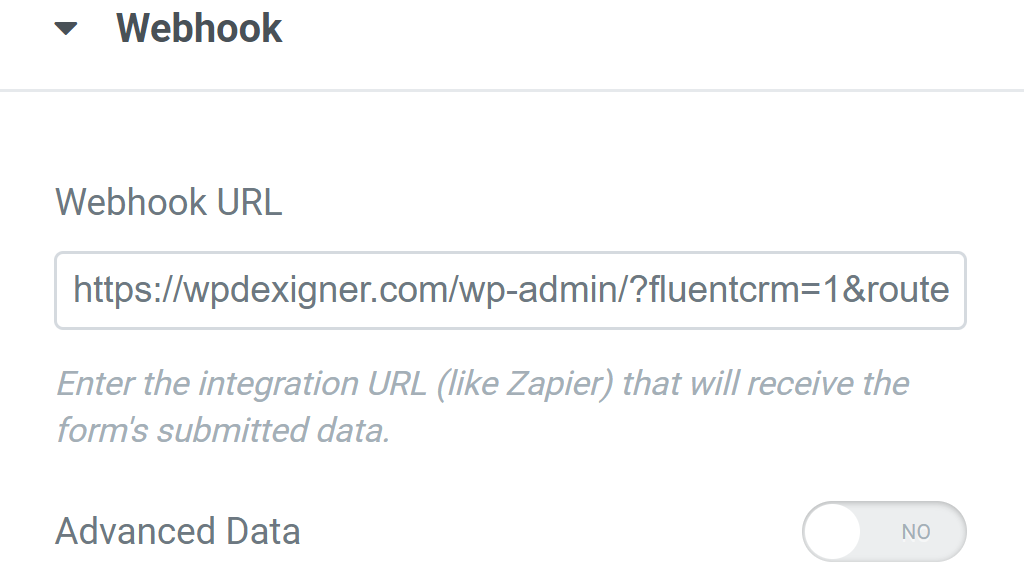
Webhook: If you want to connect Elementor forms to external API services, you can use the webhook to specify the URL to connect to the service.
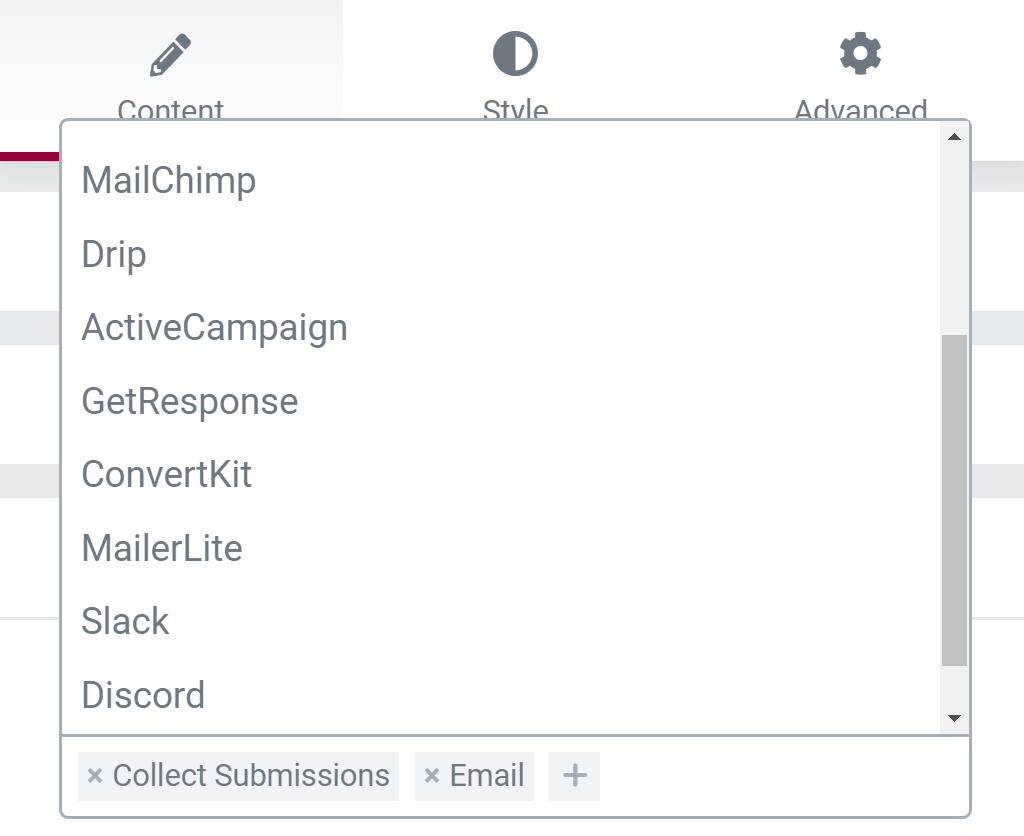
Email Marketing Service or CRM – Elementor form provides integration with 3rd party email marketing and CRM tools such as MailerLite, MailChimp, Drip, GetResponse, ConvertKit, and more. You can select the service from the list and configured options to connect the service.
Popup: Elementor Pro also comes with popup builder and you can have the popup show up when a user clicks on the submit button.
6. Steps Settings
If you have multi-step form, you’ll see the step settings in the widget pane. The step settings will allow you to choose the style and shape of the next and previous button.
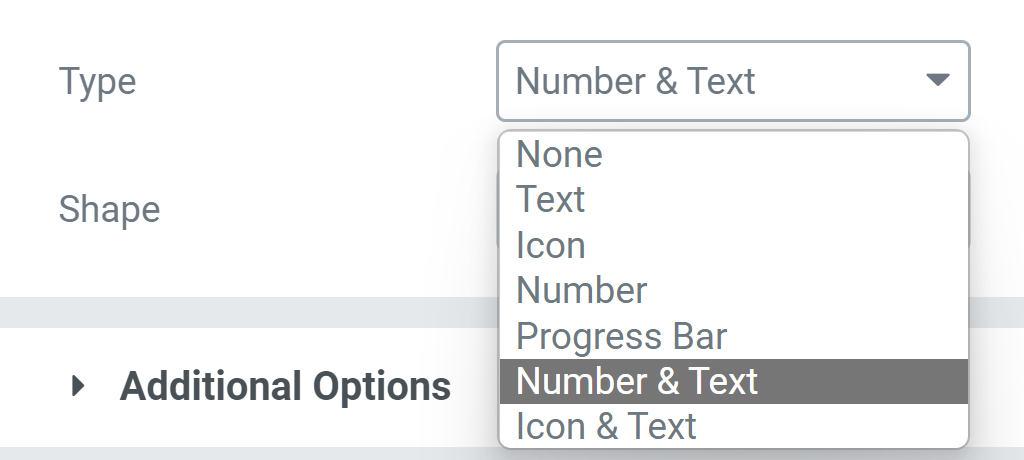
For the button type, you have different types such as text, icon, number, progress bar and much more. You also have the option of making the button rectangle, square, rounded, or none at all.
7. Setting Up The Custom Messages
Elementor form allows you to specify the custom error, warning, and success messages that add to the user experience.
In the Additional Options section, toggle On the Custom Messages to edit the response.
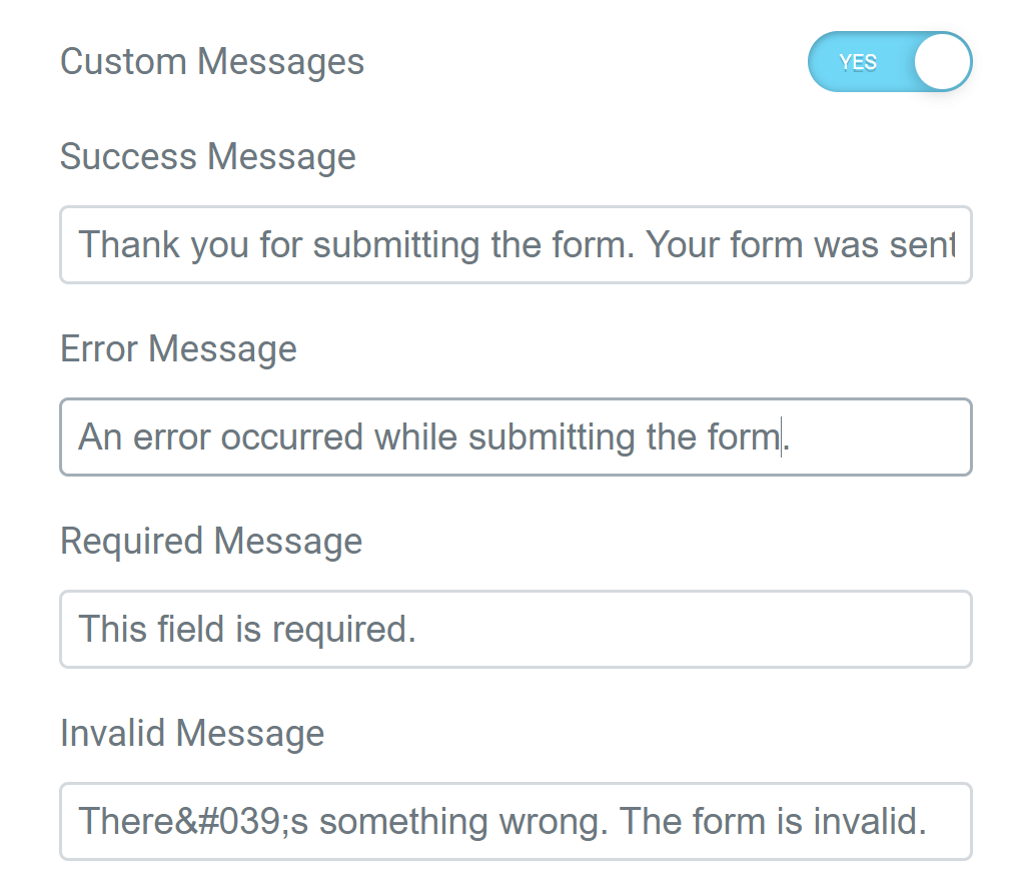
- Success Message – This message is displayed to the user when the form is successfully submitted.
- Error Message – This message is displayed to the user when an error occurs while submitting the form.
- Required Message – This message is displayed when a form field that is required hasn’t been filled in, and the user is trying to submit the form.
- Invalid Message – This Message is displayed when a user enters an invalid value and tries to submit the form.
That’s all the options you have in the content tab of the Elementor form. You also have the Style tab where you can set the colors, spacing, and typography of the form.
Since the styling options are very familiar across all widgets, I’ll skip over them and instead focus on additional CSS that you can add to your form to further customize it.
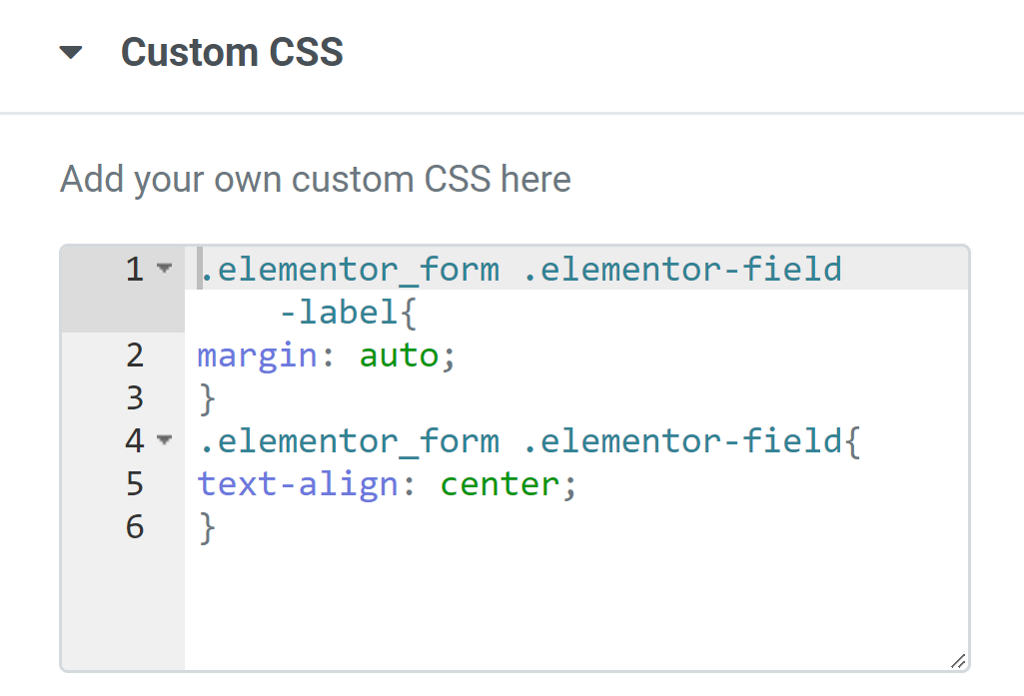
8. Additional CSS For Styling
Additional CSS is useful when it is not possible to customize parts of the website with the available options in Elementor.
Suppose you want to center align the Label and the Placeholder text of the form. If you look for these options in Elementor, they are not available.
Don’t worry, you can easily achieve it with a few lines of custom CSS code.
Before we add the code, let’s define the CSS class for the form. Go to the Advanced Tab in the Elementor widget panel and define the CSS Class as elementor_form (without any period, comma, or space).
Copy the below code and paste it under the Custom CSS tab, which is the last tab. You can also read the guide on the Elementor website to know in detail how to use selector to use in custom CSS.
.elementor_form .elementor-field-label{
margin: auto;
}
.elementor_form .elementor-field{
text-align: center;
}
Wrapping Up: Elementor Contact Form
Hush. These were a lot of options to keep track of. But if you are already familiar with Elementor, setting up the Elementor contact form will not be much of an issue for you.
Elementor forms is a very solid widget from the page builder that can help you cut down on additional dedicated contact form plugins. Though, to use it, you’ll need the Elementor Pro installed on your website. If don’t have it yet, you can get it for $49/year. Elementor Pro is worth every penny as it offers various features to create professional-looking websites.
If you want to create advanced form such as quiz and survey forms, payment forms and more, you can use a dedicated contact form plugin such as the WPForms.
FAQ’s on Elementor Contact Form
-
How do I create a form in Elementor?
You can easily create a form in Elementor using the form widget. It is a powerful widget and you can use it to create all sorts of basic forms.
-
Is the Elementor Contact form widget included in the free version?
No, Elementor form widget is part of Elementor Pro. You can get the Pro version for $49/year which gives you access to 90+ other widgets and some cool features.
-
Is it possible to create a multi-step form with the Elementor form?
You can easily create a multi-step form in Elementor by converting a regular long-form with steps field in between. The multi-step form makes the long complex forms look less intimidating, resulting in more leads!
-
Is it possible to integrate the form with third-party email marketing tools?
Yes, you can create a form to capture information of visitors and integrate it with 30+ powerful marketing automation & CRM services.
-
What is honeypot Elementor form?
Honeypot is a super-easy way to enable spam protection for your Elementor forms. This is great for both the users and the admin. Users don’t have to complete any challenge to prove the human presence and the admin does not need to configure any complicated setup to enable it.