Kadence Theme is a Gutenberg WordPress theme that is quickly gaining popularity. This is largely due to the number of features it includes.
One of these features is the Hooked Element (custom hooks), which allows you to add any content to various areas of the theme. This opens up a lot of flexibility and customization options.
In this article, we’ll look at the Kadence Element Hooks and how to configure it. We’ll also look at how it differs from other themes.
Table of Content
- How To Set Up and Configure the Kadence Hooked Element?
- Kadence Hooked Element Features
- How Is the Kadence Hook Element Different?
What is Kadence Element Hooks?
Kadence Element hooks, also known as custom hooks in other themes, allow you to “hook” your own custom code into various areas of the theme without changing the core files.
This provides your theme with additional customization and flexibility that the WordPress customizer simply cannot. The best thing about Kadence Element Hooks is that you don’t need to know how to code to use it.
To put it simply, you can use the Kadence Element Hooks to show a newsletter subscription box at the end of each blog post, ads in between posts, or to display a header or footer hello bar on the website.
How To Set Up and Configure the Kadence Hooked Element?
Kadence Hooked Element is a part of the Kadence Pro. If you haven’t already purchased the Pro theme, I strongly advise you to do so as it is one of the best WordPress themes available. You can also read my complete Kadence Theme review to learn more about the theme.
Once you’ve installed the Kadence Theme and the Pro addon, navigate to Appearance → Kadence to access the Kadence dashboard. Now, scroll down, and under Pro Addons, enable the Hooked Elements.
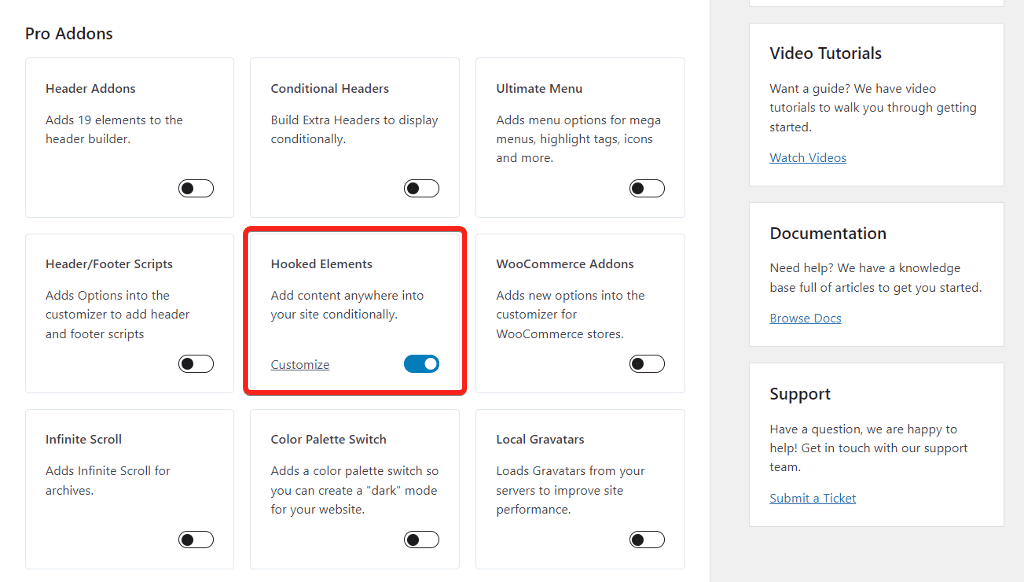
Below it, you should see a new Customize button. Click on it to go to the Hooked Elements page.
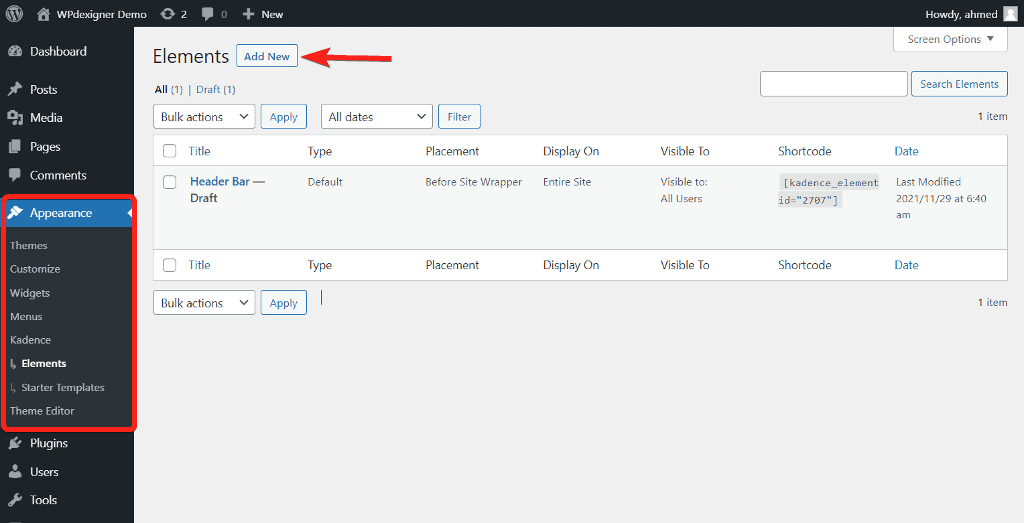
You can get to the same page by going to Appearance → Kadence → Elements and clicking on Add New.
A popup will now appear with three options and you can select:
- Default to create and design content using the WordPress block editor.
- Fixed to insert Google Analytics like code into the header or footer of the website.
- Code to add content using HTML block.
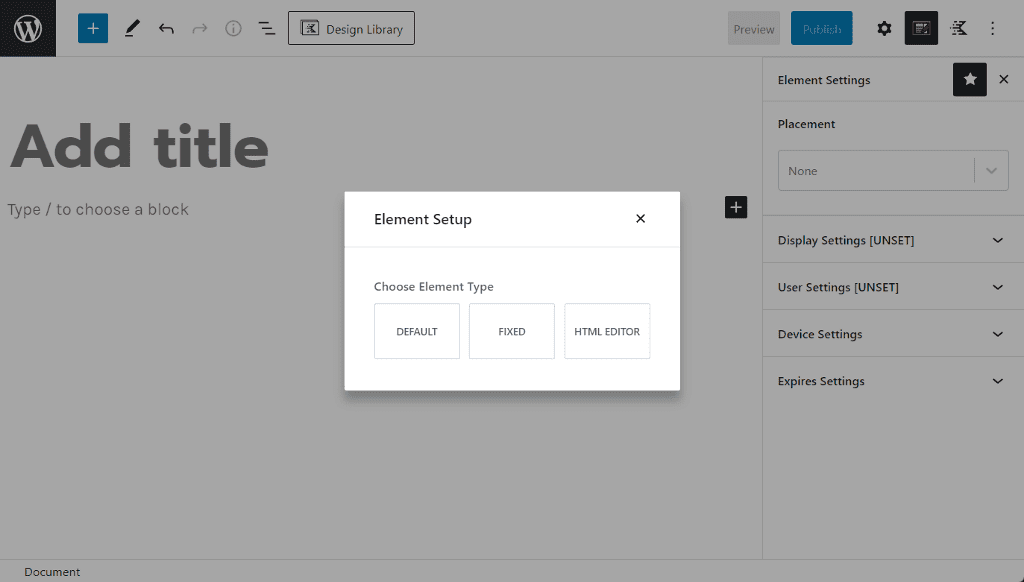
You can choose any of the options based on how and what content you want to add. Once into the editor, add a title to Kadence Element.
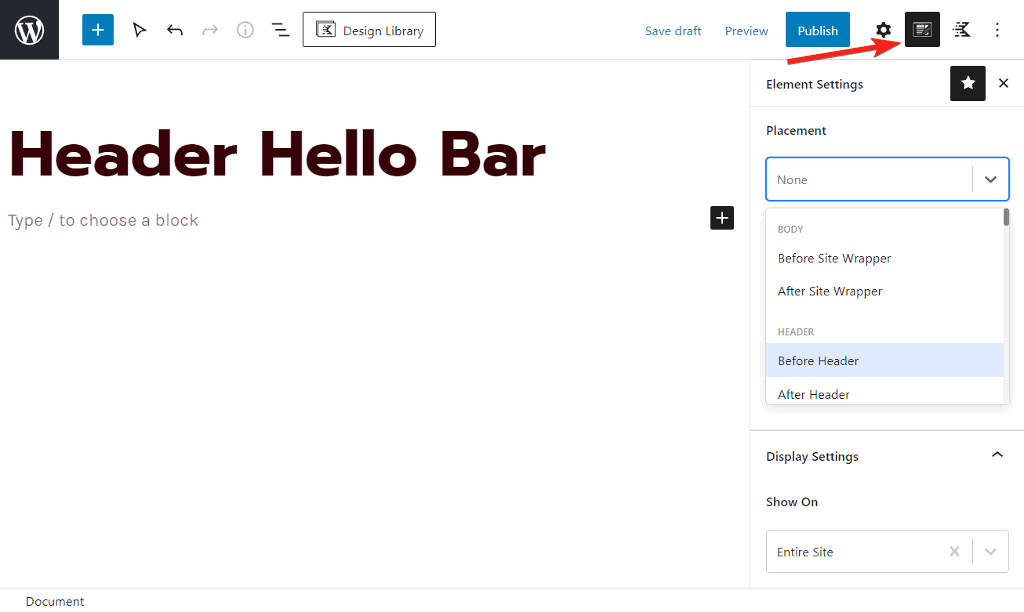
You can access all of the settings of the Element Hooks by clicking the Kadence icon on the top right corner. All settings will be displayed in the sidebar of the block editor.
Before we go ahead and look at the various settings it has, let’s take a closer look at the differences between the three options we listed above.
Default Element
With the default option, you can create content and hook it to any of the available places using Gutenberg blocks or page builders such as Elementor, Divi, Brizy, and others.
The available placement options for default type are:
- Body
- Before Site Wrapper
- After Site Wrapper
- Header
- Before Header
- After Header
- Replace Header
- Content Wrap
- Before All Content
- After All Content
- Content and Sidebar
- Before Content
- After Content
- Before Sidebar
- After Sidebar
- Single Inner Content
- Before Inner Content
- Before Inner Title
- After Inner Title
- Before Entry Content
- After Entry Content
- After Inner Content
- Comments
- Before Comments
- Before Comments List
- After Comments List
- After Comments
- Archive Inner Content
- Before Archive Inner Title
- After Archive Inner Title
- Footer
- Before Footer
- After Footer
- Replace Footer
- 404 Page
- Before 404 Page Content
- After 404 Page Content
- Replace 404 Page Content
- Mobile Menu Off Canvas Area
- Before Mobile Off-Canvas Content
- After Mobile Off-Canvas Content
- Header Account Login Modal
- Before Login Form
- Left of Login Form
- Right of Login Form
- After Login Form
- Replace Login Modal
- Custom
- Custom Hook
Woah! That is a lengthy list. Kadence Element hook covers almost every area of the website where you can think of adding custom content.
If you find it difficult to visualize what each placement means, there’s a free plugin called Visual Hook Guide for Kadence. Once you install the plugin, you can visit the front-end of your website on any page and simply click Kadence Hooks → Action Hooks from the top admin menu.
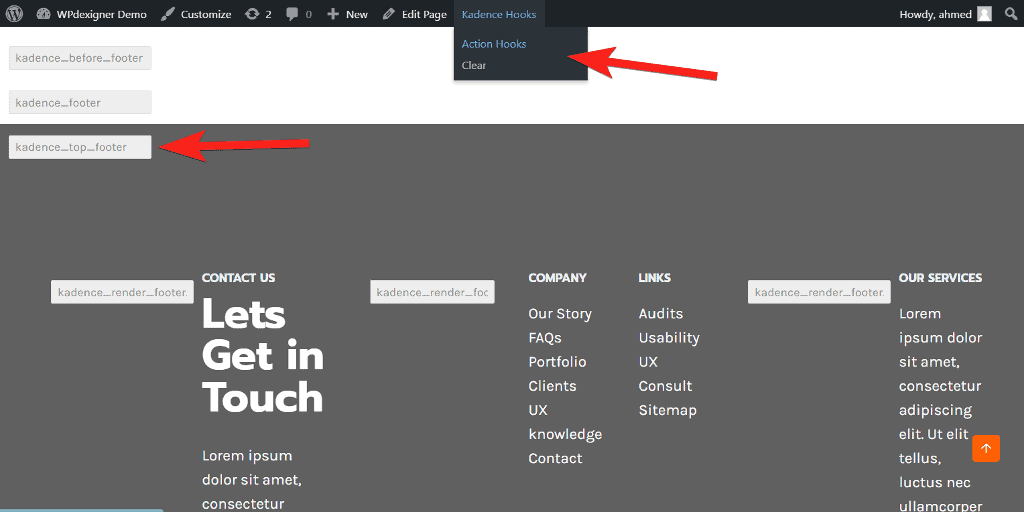
The plugin will display all hook placements visually with a name. You can copy the name and look for the same name in the Kadence Element Hooks editor.
Fixed Element
Just like the default type, you can use Gutenberg blocks and page builders to create content for the fixed element. The only difference is in the placement options available.
- Fixed On Top
- Fixed Above Transparent Header
- Fixed Top After Scroll
- Fixed Bottom After Scroll
- Fixed On Bottom
- Fixed Bottom (no space below footer)
A use case for the fixed element type is to have a sticky section at the top or bottom of the website when a user scrolls through it.
This is useful when you want to display any important announcements or promotional messages.
Code Element
Instead of the WordPress block editor, the code element inserts code into it using the HTML block.
This is useful when you want to add tracking codes such as Google Analytics into your website.
The available placement options for the HTML code are:
- Header – inside <head> tag
- After <body> tag
- Footer – before </body> tag close
The remaining placement areas are similar to those in the default type, so I won’t go over them again.
Now that we’ve covered the various Element types in-depth, let’s take a look at the various Element settings Kadence has. To access the settings, click on the Element settings icon in the top right corner.
Kadence Hooked Element Features
Kadence Hook Elements includes a number of features. Aside from placement options, it also includes display settings, show and hide for specific users, show and hide on specific devices, and the ability to set an expiry date for the element.
This gives you granular control over the Kadence Element hooks, allowing you to configure them exactly how you want.
Let’s take a closer look at the settings.
1. Display Settings
The display settings allow you to specify which page the element content should be displayed on. You can specify whether it should appear on the entire website or on specific pages such as single pages, 404 pages, search result pages, and so on.
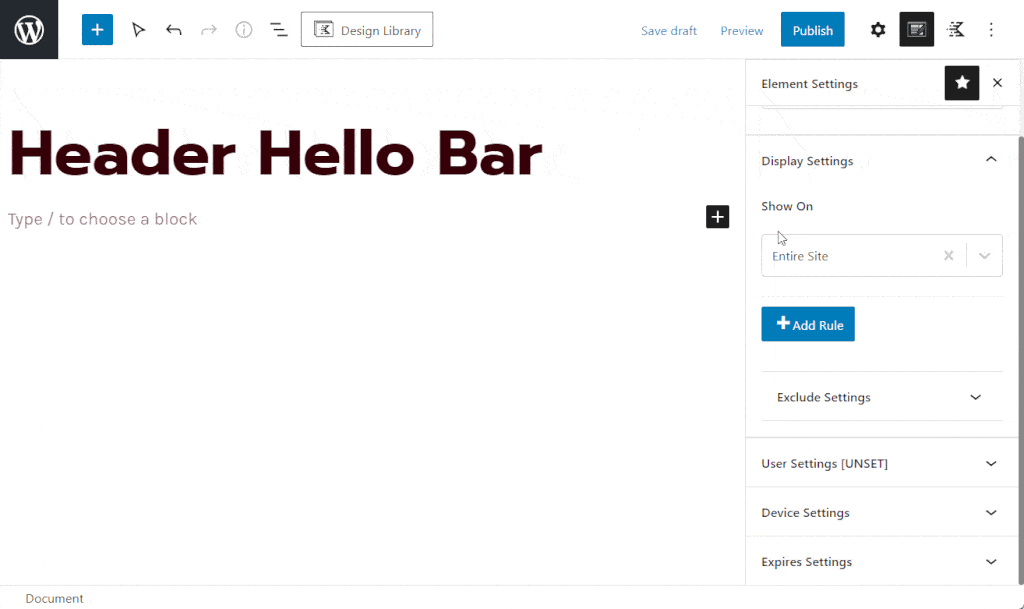
If you want to display it on the entire website and only want to exclude it on specific pages, it lets you even specify those pages.
2. User Settings
User settings allow you to control who sees your content. You can configure it to show to all users, logged-in users, logged-out users, specific website user roles, and much more.
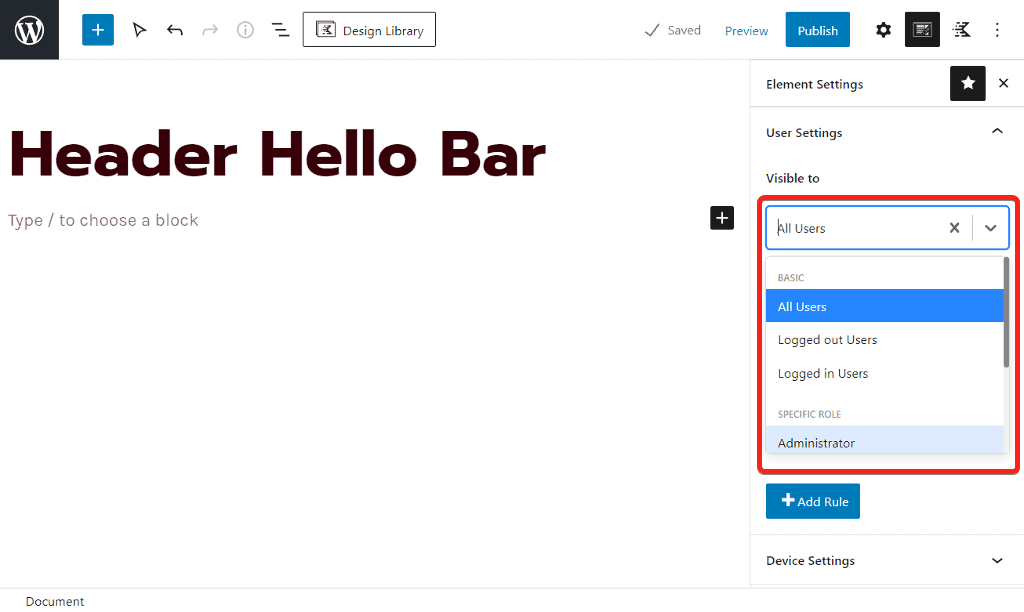
This is especially helpful for membership sites and WooCommerce stores.
As an example, you could show certain content to logged-out users in order to attract them to buy from your website.
3. Device Settings
The granular control over everything does not stop there. You can specify which devices based on screen size should show the content using the Kadence Element Hooks.
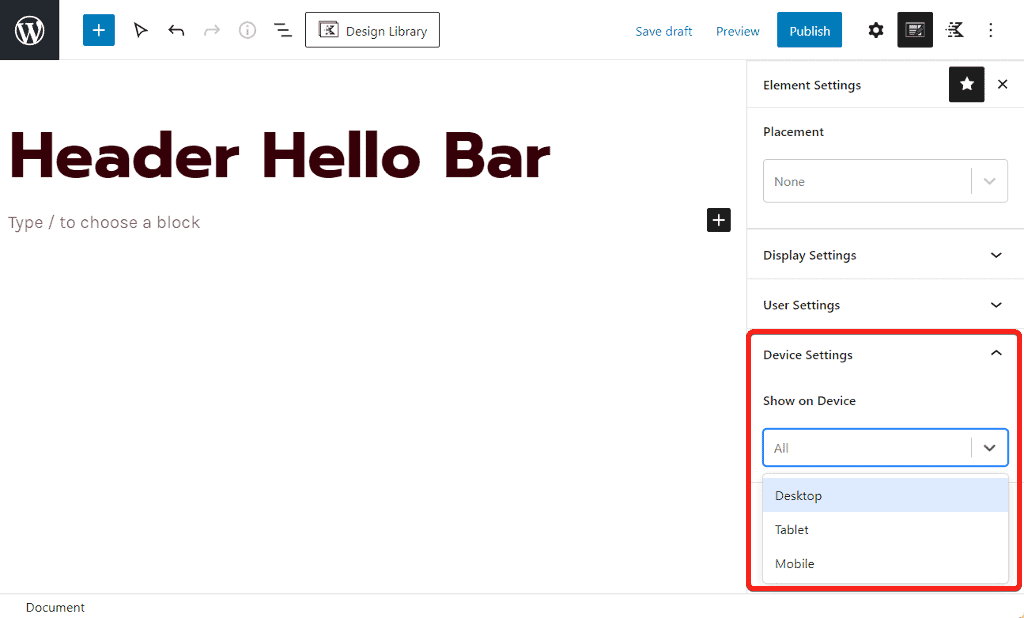
You can choose to show it on all or specific devices between desktop, tablet, or mobile device.
4. Expiry Settings
This feature is useful if you run a seasonal promotion on your website. Using this setting, you can create the promotion content in Kadence Element, set an expiration date, and never look back.

After the expiration date, the promotion will automatically stop showing up on the website. Isn’t this a nice feature to have? 🤩
How Is the Kadence Hook Element Different?
It’s similar to the hooks element in GeneratePress, but with a few Kadence-specific features.
To create custom hooks, the Kadence theme uses the same Gutenberg or WordPress block editor instead of the classic editor.
The Kadence hook element differs with features that let you set device and expiry settings for all hooks.
That’s it for this tutorial! You can also read my comparison of the Astra vs Kadence vs GeneratePress to find out which among these themes is the best.